

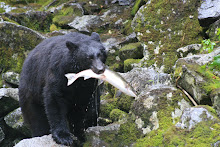
 I have been experimenting over the last few weeks with converting photos (see more) to black and white but leaving one small element of colour in them such as the couple of photos with this article. I use an older version of Photoshop Elements (the junior version of Photoshop!) but the general technique should work with most photo editting programs.
The general method is to add a second layer of the same photo over the original and then convert that to black and white (by desaturating all the colour or similar). Small elements of the black and white photo are removed and the resultant colour unearthed from the lower layer shows through revealing the touch of colour.
Here's the step by step guide using Photoshop Elements.
1. Seelct your favourite photo.
2. Click on Layer > New Adjustment Layer.
3. Select Gradient Map (and pick the black and white from the drop down). Note that the foreground colour is now black and the background colour is now white in readiness for step four below. Alternatively, select Hue/Saturation and move the saturation slider to zero. 4. Click on the white square that shows as the adjustment layer (see diagram right with red circle and click on it for a larger view). Ensure black is the foreground colour and use brush or pencil to colour over the element that you want to be coloured. Selection commands such as lasso and magic wand can be used to reduce the risk of colouring over the lines.
5. Relax if you colour over the lines. If you wish to convert some areas back to black and white, switch the foreground/background colour so the foreground colour is white and paint away removing the colour again (hitting "X" automatically swaps the two colours around).
6. Save as a .psd if you wish to work on it further but otherwise simply sit back and enjoy your handiwork.
I'd love to view some of your efforts - please share them in the comments below.
Saturday, November 19, 2011
Photo Tip: Touch of Colour Technique
Subscribe to:
Post Comments (Atom)


10 comments:
I too have been toying around with selective coloring lately; a fun effect when combined with a good subject.
Nice tip Mark. Think I'll have to tinker with it.
I like this interesting use of colour - I don't have photoshop elements as when I looked at buying photoshop it seemed hugely expensive but I'm wondering if there are any free or cheaper simple programmes that would do this
@anil: I see more and more on the web. I find them striking but I think the art (which I haven't worked out yet) is to pick good images. I think I have too big an item to highlight. Sticking truly to a "touch" of colour may help.
@barbara: I'd love to see some of your photos in this form Barbara.
@heather: I'd suggest trying either PAINT.net or The Gimp as two potential free photo editting packages. They may well have features equivalent to that described below.
THe pics are simply awesome and nice tip to play around with colors.
@pooja: Have a go at it yourself...
Great tips, I really like it do you have a Technique how to find cheap flights? lol..
nice informative post
photography forums
Post a Comment